![[Previous]](prev.gif)
![[Next]](next.gif)
![[Contents]](toc.gif)
![[Index]](index.gif)
You may choose to use local applications for a variety of reasons including:
- Improving interactive performance
- Freeing up host memory
- Reducing the load on the network and host computer.
HP Netstation Software includes the following local applications:
- WhiteBoard, an X Window System graphics local application.
See Starting WhiteBoard for details.
- SharedX, which allows you to share X protocol-based
applications between two or more Netstations. See Starting SharedX for details.
- Flash File Manager, which allows you to copy files to and
from a flash DIMM, and format a flash DIMM. See Using Flash File Manager for details.
- xclock, a digital or analog clock on your desktop.
See Starting Local xclock for details.
- xlock, which helps you secure your Netstation when it is left unattended.
See Starting Local xlock for details.
- format, which allows you to format floppy disks. Refer to the man
page for
hpxt.format for details.
You can also order the Navio Navigator for HP Netstations product.
This is a web browser (based on Netscape Navigator 3.0)
that runs as a local client on the Netstation.
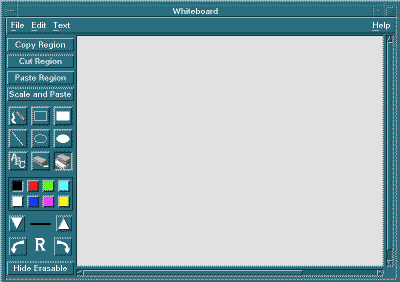
WhiteBoard is an X Window System graphics application that you can
run as a local application on your Netstation:

Whiteboard Graphics Application
You can use local WhiteBoard to:
- Draw geometric shapes, lines and text
- Cut, copy and paste
- Rotate images 90, 180 and 270 degrees
- Copy areas from outside the window and place them in the WhiteBoard window
- Manipulate colors, line thicknesses and fonts
- Save and read images in TIFF, JPEG and XPM formats
- Print files.
There are three ways to start WhiteBoard:
- To start WhiteBoard from a local terminal emulator window, type:
hpxt.whiteboard
- If you are using VUE/RX,
select the MPower icon on the control panel,
then select the WhiteBoard icon.
- Drag and drop a file onto the WhiteBoard icon.
For detailed information on using WhiteBoard as a local client, type:
man hpxt.whiteboard
If you are using MPower,
you can run WhiteBoard either locally or from the host.
To switch from one to the other, do the following:
- Log into an MPower session.
- Pull up the Tools icon.
- Click on the "General" toolbox.
- Double-click on the "Netstation" icon.
- Double-click on the "HpnsSelectMPower" icon.
- For each MPower application, a dialog box appears.
It says where you are currently running the application
(from the host or from the Netstation),
and asks if you want to change this.
Select
[Yes] or [No] for each application.
You can use the local client version of SharedX to share X protocol-based
applications between two or more Netstations.
You (the sender) on one system can
send a selected window or windows to a user (the receiver) on another system.
You can send one or more windows to several receivers simultaneously.
Note: The sender must have the SX extension loaded.
The receiver does not need SX to receive a window.
As the sender, you can:
- Decide who may input to a shared window
- Control whether the receiver can input into the shared window
- Allow the receiver to forward the window to another receiver
(termed "daisy chaining").
During a SharedX session, you can also choose to use a
shared pointing device, called a "telepointer", which can be manipulated by
both the sender and all receivers.
SharedX also includes a sample address book, font aliases and user preferences.
There are two ways to start SharedX:
- To start SharedX from a local terminal emulator window, type:
hpxt.SharedX
- If you are using VUE/RX,
select the MPower icon on the control panel,
then select the SharedX icon.
Note: User preferences and address books will be available only
if SharedX is running with a peer.
For detailed information on using SharedX as a local client, type:
man hpxt.SharedX
If you are using MPower,
you can run SharedX either locally or from the host.
To switch from one to the other, do the following:
- Log into an MPower session.
- Pull up the Tools icon.
- Click on the "General" toolbox.
- Double-click on the "Netstation" icon.
- Double-click on the "HpnsSelectMPower" icon.
- For each MPower application, a dialog box appears.
It says where you are currently running the application
(from the host or from the Netstation),
and asks if you want to change this.
Select
[Yes] or [No] for each application.
You can use the Flash File Manager to:
- Copy files from disk to a flash DIMM
- Copy files from a flash DIMM to disk
- Format a flash DIMM.
To start the Flash File Manager, type:
hpxt.ffm
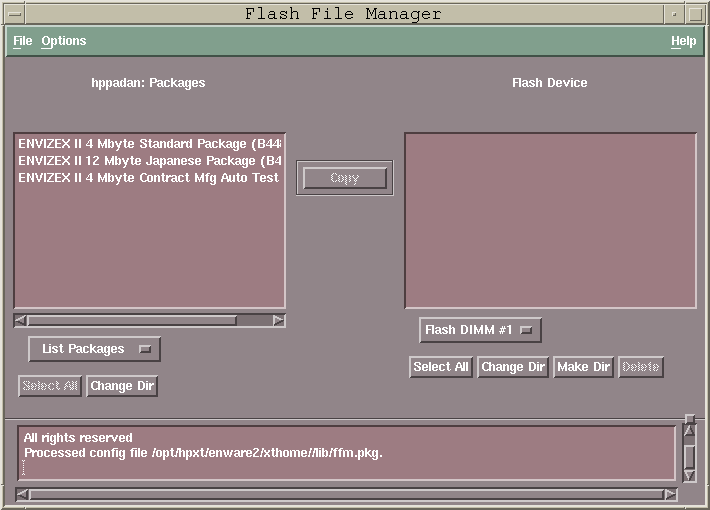
The main screen appears.

Flash File Manager Main Screen
The left window lists files on disk.
The right window lists files on the flash DIMM.
The bottom window contains error and information messages.
In general, you select the files that you want to copy,
select where you want to copy them, and then select the [Copy] button.
The Flash File Manager configuration file defines several packages.
Each package is a complete
set of files that some users will want to store on a flash DIMM.
Note:
If you copy a package, the flash DIMM is automatically formatted.
If you want to copy a package without formatting the flash DIMM first,
you must select each file in the package individually.
You copy a package as follows:
- Select
Options on the menu bar,
and specify whether you want to write a directives file or fonts.dir
file
on the flash DIMM.
- If the button beneath the left window does not say
[List Packages],
select this button and then select List Packages.
A list of packages appears in the left window.
- The button beneath the right window says either
[Flash DIMM #1] or
[Flash DIMM #2].
If this is not the flash DIMM that you want to use, select this button
and then select the other flash DIMM.
- In the left window, select the package that you want to copy.
- Select the
[>>Copy>>] button to format the flash DIMM and
copy the selected package from disk to the flash DIMM.
You can copy individual files and predefined filesets to a flash DIMM.
This does not erase the files already on the flash DIMM.
You copy files as follows:
- Use the button beneath the left window to select what is listed in
the left window.
You can select:
- List Package
- Lists the packages that are defined in the Flash File Manager
configuration file.
- List Filesets
- Lists the filesets that are defined in the
Flash File Manager configuration file.
- List Files
- Lists the files that are defined in the
Flash File Manager configuration file.
- Host FileSystem
- Lists the files in the current directory.
To change the current directory, select
[Change Dir].
You must select these options in incremental order (for example, you must
select List Filesets before you can select List Files. However, you
can select Host FileSystem at any time.
- The button beneath the right window says either
[Flash DIMM #1]
or [Flash DIMM #2].
If this is not the flash DIMM that you want to use, select this button
and then select the other flash DIMM.
- The right window contains a list of files in the current directory of
the flash DIMM.
To select a different directory or create a new directory, select
[Change Dir] or [Make Dir].
- In the left window, select the files or filesets that you want to copy.
- Select the
[>>Copy>>] button to add the selected files or filesets
to the current directory of the flash DIMM.
Any existing file with the same name is overwritten.
You can copy files from a flash DIMM to disk.
You copy files as follows:
- The button beneath the right window says either
[Flash DIMM #1]
or [Flash DIMM #2].
If this is not the flash DIMM that you want to use, select this button
and then select the other flash DIMM.
- If the button beneath the left window does not say
[Host FileSystem],
select this button and then select Host FileSystem.
A list of files in the current directory appears in the left window.
To change the current directory, select [Change Dir].
- In the right window, select the files that you want to copy.
- Select the
[<<Copy<<] button to copy the selected files
from the flash DIMM to the current directory on disk.
Any existing file with the same name is overwritten.
To format a flash DIMM,
select File on the menu bar, then select Format Device.
On the submenu, select either Flash DIMM #1 or Flash DIMM #2.
For detailed information on using the Flash File Manager, type:
man hpxt.ffm
or view the online help within the program.
Warning:
You can also use the Flash File Manager to reprogram your Netstation's
built-in flash ROM. You should update your internal ROM only on the advice of
HP Support. For details, refer to the man page hpxt.ffm.
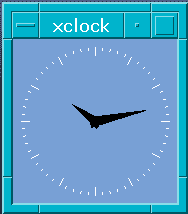
Local xclock is a version of xclock that runs on the Netstation. You can run
the clock in digital or analog form:

xclock Local Client
To start local xclock from a terminal emulator window, type:
/opt/hpxt/enware2/bin/hpxt.xclock
For more xclock options, type: man hpxt.xclock
Local xlock is a version of xlock that runs on the Netstation.
You can use xlock to:
- manually lock your display until you type in your password
- automatically lock your display after a specified amount of time
- automatically log out after a specified amount of time.
Please note that xlock is not linked to the X server screen saver function.
To start local xlock from a terminal emulator window, type:
/opt/hpxt/enware2/bin/hpxt.xlock
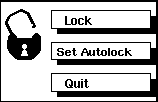
The following icon appears on your screen:

xlock Local Client
Note:
To lock your Netstation automatically after 15 minutes,
click on the Set Autolock button.
To change the time limit, you can use the -autolock option,
as described below.
You can add several options to the above command line, including the following:
-password password- specifies the
password you need to type to unlock the display. The default is the
password of the user who invoked xlock.
-autolock seconds- specifies the time in seconds before
your display locks automatically. Note that if you choose this option, there
will be no
Set Autolock button on the xlock screen icon.
-autologout seconds- specifies the time in seconds before
you are automatically logged out.
You can use this option only for your own display.
-nowindow - If this option is set along with the autolock
or autologout option, the xlock icon will not appear on the screen.
-mode pattern - specifies the pattern that covers the
display.
You can specify the following patterns:
blank,
decay,
flame,
hop,
image,
life,
message,
pyro,
qix,
random,
rocks,
rotor,
slide,
swarm,
worm.
For a description of these patterns, see the man page.
For more xlock options and information, type:
man hpxt.xlock
![[Previous]](prev.gif)
![[Next]](next.gif)
![[Contents]](toc.gif)
![[Index]](index.gif)
![[Previous]](prev.gif)
![[Next]](next.gif)
![[Contents]](toc.gif)
![[Index]](index.gif)


