![[Previous]](prev.gif)
![[Next]](next.gif)
![[Contents]](toc.gif)
![[Index]](index.gif)
This chapter describes how to use the various accessories that you can add to your base unit. Topics include:
If you have not yet installed your accessories, you can find installation instructions in the box for each accessory kit.
If you have an HP ENVIZEX II Netstation, you can install a floppy drive that allows you to transfer files between DOS and UNIX. The floppy system currently supports DOS versions up to and including DOS 6.0.
Topics in this section include:
To format a high-density (1.44 MB) disk, type:
remsh terminalname format -h
(On Sun systems, use rsh instead of remsh.)
To format a low-density (720 K) disk, type:
remsh terminalname format -l
Refer to
the man page for hpxt.format for more information.
[F12] to access the configuration screens.
[Terminal], then [Floppy].
[Format Floppy].
$HOME/floppy directory. This causes the floppy to unmount. If the
floppy unmounts, you have to reboot your Netstation to remount it.The floppy drive is automatically mounted and accessible as $HOME/floppy
(or if you prefer, $HOME/a:).
By default, the floppy drive is accessible only from the login server (the host
that is running an X session manager such as XDM, HP VUE, or dtlogin).
You can proceed to read from and write to the floppy drive as if it were a directory on your UNIX system, with one exception: if you are working within an application program, you must save the file to the UNIX filesystem before you copy it to the floppy.
For example, to save a file from a spreadsheet program, the user Smith
first needs to save the file to the UNIX filesystem.
To write the file data.tmp to the floppy drive, Smith types:
cp data.tmp $HOME/floppy/data.tmp
or
cp data.tmp ~/a:
The floppy's DOS-based file system does not support UNIX hard links. If your application tries to perform a hard link operation on the floppy drive, you will see an error message.
When you transfer files back and forth between DOS and UNIX, select file names that suit DOS naming conventions. With DOS, a file name can be eight characters with a three-character extension (for example, acctdata.wrk) If your file name is too long, the system uses the last eight characters of the name and the first three characters of the extension.
If you use a session mount, which is the default, you need only to log out from your X session before you switch off the Netstation.
If instead you use the optional mounting methods described in Changing How the Floppy Drive Is Mounted, you need to unmount the floppy before switching off the Netstation. Failure to do so may result in "hung" mounts until the floppy is remounted.
[F12] to access the configuration screens.
[Terminal].
A [Floppy] option should appear in the middle column.
If this option does not appear, the floppy has probably not been
installed correctly. Follow these steps:
The following diagram illustrates the connection:
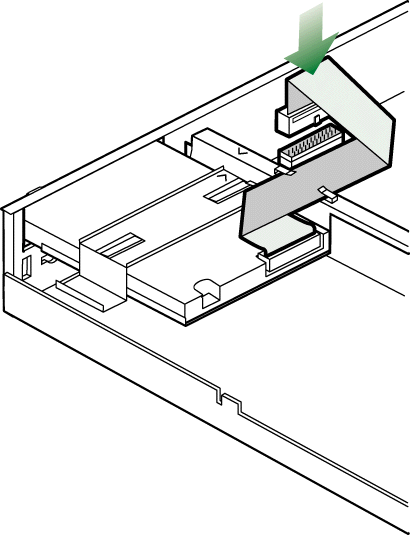
Connecting the Floppy
To confirm that the Netstation loaded the Floppy module:
[F12] to access the configuration screens.
[Diagnostic], then [Configuration].
Under Extensions, you should see:
NFS Server
DOS File System
You should also check the /opt/hpxt/enware2/xthome/bin/directives file to make sure the Floppy module is set
to Auto.
If these lines do not appear in both the configuration screens and the directives file, you or your system administrator needs to reinstall the HPXT-FLOPPY fileset.
When you log into an HP or Sun host computer that has HP Netstation Software installed,
lines added to Xstartup and Xreset
by the HP Netstation Software installation scripts automatically
NFS-mount the floppy drive and create a symbolic link to $HOME/floppy.
If you are using CDE, use the instructions in
Using an Automount Daemon as an example.
On an AIX host computer, the floppy drive is not automounted.
Refer to the sample files provided in the /opt/hpxt/enware2/xdm directory
for more information.
With this mount and symbolic link in place, you can use the floppy drive as if it were a directory on your UNIX system.
To change the way NFS mounts the drive, refer to the following sections:
In a default environment, the Netstation floppy drive is automatically NFS-mounted when you log in through XDM, dtlogin, or vuelogin. If you want to change this behavior, you can set an option so that:
/opt/hpxt/enware2/share
/examples/hpxt_floppy to your
home directory.
$HOME/.hpxt_floppy. The next time you log in, the
floppy mount behavior will be changed accordingly.
By default, with XDM, dtlogin, and vuelogin, the Netstation uses session mounts set up in:
/Xstartup, and
/Xreset
where path is:
/opt/hpxt/enware2/xdm /usr/vue/config /etc/vue/config /etc/dt/config These files mount the floppy drive and create a symbolic link to
$HOME/floppy
when users log in and unmount the drive when users log out.
For example, if you use an application that runs on a server other than your login server, you can use an automount daemon to enable that host to access your floppy drive.
Once you have set up the automount daemons, whenever you access one of these servers, the daemon:
$HOME/floppy.
To set up an automount daemon, perform the following steps on each computer you access:
Xstartup and Xreset that
mount and unmount the floppy.
/etc/auto.hpxtfd
and put the following line in it:
* -soft,retrans=6,timeo=50 &:/hpxtfd
/etc/netnfsrc2
and find the two occurrences of the line that starts the automounter.
By default, it is:
/usr/etc/automount
/usr/etc/automount /nfs -hosts
/hpxtfd /etc/auto.hpxtfd
/usr/etc/automount /hpxtfd /etc/auto.hpxtfd /nfs -hosts
/etc/rc.config.d/nfsconf
and set variables to reasonable values such as:
AUTOMOUNT=1
AUTO_MASTER="/etc/auto_master"
AUTO_OPTIONS="-f $AUTO_MASTER"
/etc/auto_master
and add a line like:
/hpxtfd /etc/auto.hpxtfd
/etc/rc.local
and add the following line:
automount -f /etc/auto.hpxtfd
/floppy directory and the
automounter's mount point. Type:
ln -s /hpxtfd/terminalname $HOME/floppy
If you have superuser privileges, you can mount and unmount the floppy as required:
Xstartup and Xreset that
mount and unmount the floppy.
/etc/mount terminalname:/hpxtfd /users/username/floppy -o soft,timeo=50
/sbin/mount -o soft,timeo=50 terminalname:/hpxtfd /users/username/floppy
/etc/umount /users/username/floppy
/sbin/umount /users/username/floppy
/opt/hpxt/enware2/bin/admin/mountfloppy.
When you log in from a Netstation that has a floppy drive,
a line in the Xstartup file automatically NFS-mounts your floppy drive.
To enable other Netstation users to log into the same account
and access their floppy drives, modify Xstartup as follows:
$HOME/floppy
Xstartup file:
/opt/hpxt/enware2/xdm/Xstartup
/usr/vue/config/Xstartup
On HP-UX 10.x systems, this file is: /etc/vue/config/Xstartup
.../mountfloppy $DISPLAY $USER $HOME/floppyand add
/$DISPLAY to the end.
Xreset file.
.../unmountfloppy $DISPLAY $USER $HOME/floppy
and add /$DISPLAY to the end.
At log in, users can access their floppy drive as $HOME/floppy/$DISPLAY
For example, the user of the Netstation
called xterm12 accesses the floppy drive as:
$HOME/floppy/xterm12
If you use an HP version of XDM (including dtlogin or vuelogin), the floppy drive is mounted automatically. If you choose to use your own version of XDM, you will need to modify some files so that the floppy can be mounted automatically.
For an example of how to mount and unmount the floppy drive automatically, refer to the following files:
/opt/hpxt/enware2/xdm/Xstartup
/opt/hpxt/enware2/xdm/Xreset
You can make similar modifications to your own XDM files. Sample Xstartup
and Xreset files
have been provided in the /opt/hpxt/enware2/xdm directory. You can
modify these files and replace your XDM files accordingly.
Under some versions of AIX, these files have been renamed
to GiveConsole and TakeConsole.
If you order the audio accessory kit, you can build or use multi-media applications that incorporate audio components. You can use either or both of the following:
Because both of these methods set the same variables, you may experience conflicts if you try to use both methods (especially if you try to use both at the same time).
For more information, see:
On any Netstation with the audio card installed, you can use the configuration screens to work with audio input and output. This is described in the following sections:
To play an audio file, do the following:
[F12] to access the configuration screens.
[Terminal].
[Audio Control].
[Audio Player].
[Play].
If you have HP-UX, you
can find sample audio files in /usr/audio/sounds (/opt/audio/sounds
for HP-UX 10.x).
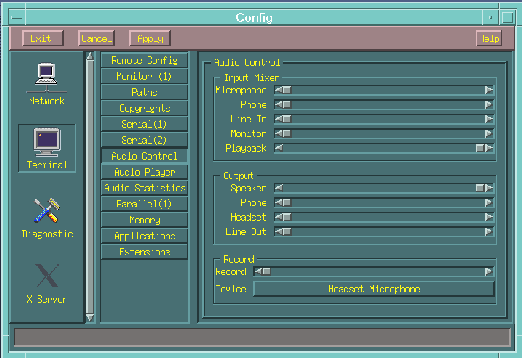
The Audio Control Configuration Screen
You can mix various audio sources and send the result to an output device. For example, you can mix audio from the telephone and a file that you are playing back.
To mix audio input, do the following:
[F12] to access the configuration screens.
[Terminal].
[Audio Control].
To play an audio file, complete the following steps:
[F12] to access the configuration screens.
[Terminal].
[Audio Control].
[Audio Player].
[Play].
If you have plugged your telephone into your Netstation, you can use File Playback:
[F12] to access the configuration screens.
[Terminal].
[Audio Control].
[Audio Player].
[Play].
To record an audio file, do the following:
[F12] to access the configuration screens.
[Terminal].
[Audio Control].
[Audio Player].
[Record].
The full functionality of the HP Audio Editor is available if you have access to an HP audio server running on an HP 9000 Series 700 or Series 800 workstation. The host must be running HP-UX 9.03 (or greater) or HP MPower 1.2 (or greater).
If you do not have access to such a server, you can still play files but you may prefer using the Netstation audio functions (described in Using the Netstation Audio Support).
Topics in this section include:
Before you begin:
Connect the audio jacks into the front of the Netstation from left to right as follows:
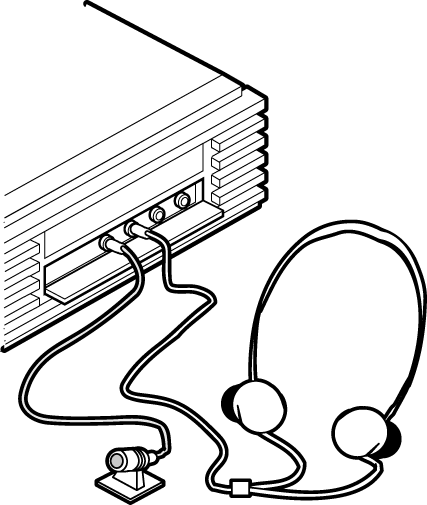
Audio Jacks for the ENVIZEX II Netstation
If you have external speakers, ensure they are plugged into the line out connector. Note that external speakers must be amplified.
If you are connecting to a telephone, ensure that the telephone cable is plugged in to the bottom of the Netstation as follows:
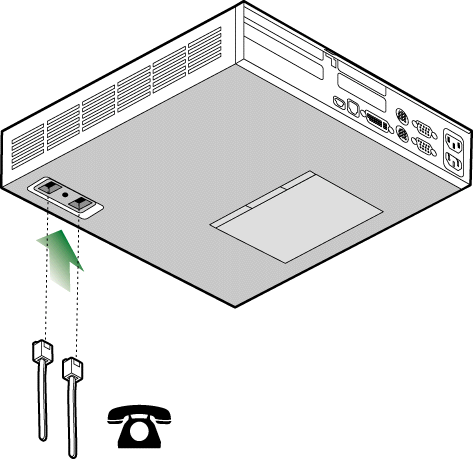
Telephony Jacks for the ENVIZEX II Netstation
At power up, the Netstation automatically detects
that you have installed
an audio card and configures the Netstation accordingly.
The audio data goes to the device specified by the DISPLAY environment
variable or to the device specified by the AUDIO environment
variable. If the audio server cannot find these values,
the audio data goes to the workstation, not the Netstation.
If your audio plays on the host instead of your Netstation, you need to set
your AUDIO environment variable as described in Directing the Audio Data to the Netstation.
If your audio plays on the Netstation but you need to change
where it plays (the internal speaker or your headphones),
refer to Directing the Audio Data within the Netstation.
If your audio plays on the host instead of your Netstation, you need to set
your AUDIO environment variable.
To do this, put the following line in your
$HOME/.xsession file or, for HP VUE users, in your
$HOME/.vueprofile file:
AUDIO=terminalname:0
export AUDIO
setenv AUDIO terminalname:0
You may need to control whether your audio plays to the internal speaker
or to your headphones. You can do this by setting the SPEAKER
environment variable or by using the audio control
panel, as described in the following two sections.
To set the SPEAKER environment variable, put the following lines in your
$HOME/.xsession file or, for HP VUE users, in your
$HOME/.vueprofile file:
SPEAKER=EXTERNAL
export SPEAKER
setenv SPEAKER external
SPEAKER=INTERNAL
export SPEAKER
setenv SPEAKER internal
To access the audio editor's control panel, type the following from a
terminal emulator window:
/usr/audio/bin/AudioCP &
For HP-UX 10.x systems, type: /opt/audio/bin/AudioCP &
You control where the audio goes by selecting the "Output" pulldown, then choosing "Speaker" and/or "Headphones."
To load a sample audio file:
/usr/audio/bin/audio_editor or
/opt/audio/bin/audio_editor)
/usr/audio/sounds (/opt/audio/sounds
for HP-UX 10.x). To choose one
of these samples, do the following:
/usr/audio/sounds/*
or /opt/audio/sounds/*
[Filter].
[OK].
To play the sample file, click on [Play]. You can control the volume of
the sound by using the audio editor's control panel.
To confirm that the audio card was installed correctly and its software loaded, follow these steps:
[F12] to access the configuration screens.
[Terminal], then [Extensions].
Audio hardware driver Auto Active -Audio
 Audio hardware driver  Auto Active  -Audio
 HP Audio Server        Auto Active  -AServer
If you do not see any references to the audio board, check that it was installed correctly:
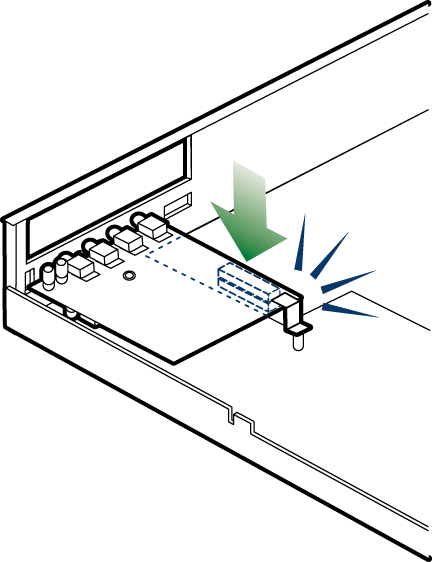
Connecting the ENVIZEX II Audio Card
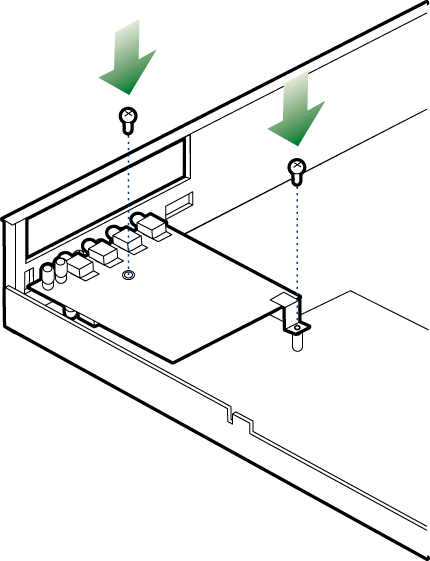
Grounding the ENVIZEX II Audio Card
/opt/hpxt/enware2/xthome
/bin/directives file to make sure the Audio module is set
to Auto.
By installing a flash DIMM in your HP Netstation, you can:
When you switch on a Netstation it downloads its X server file, rgb.txt file, and fonts from a file server. In most cases, the Netstation receives these files from a host computer (the file server) or from a flash DIMM installed in the Netstation. However, you can also set up an HP Netstation with a flash DIMM to boot any number of similar Netstations. In this case, the Netstation with the flash DIMM functions as the file server.
[F12] to access the configuration screens.
[Terminal] configuration screen.
[Extensions].
[Load Next Boot]. "Userload" appears on the NFS Server line.
[Apply].
[F12] to access the configuration screens.
[Network], then [File Server].
[Terminal], then [Paths].
[Base Path] field is set to:
/opt/hpxt/enware2/xthome.
If the Netstation does not boot from the flash DIMM, you can try the following:
To confirm that the flash DIMM was installed correctly, follow these steps:
[F12] to access the configuration screens.
[Terminal], then [Extensions].
You should see the following:
NFS Server Auto Active -NFSServer
If the NFS Server says anything else, check that the flash DIMM was installed correctly:
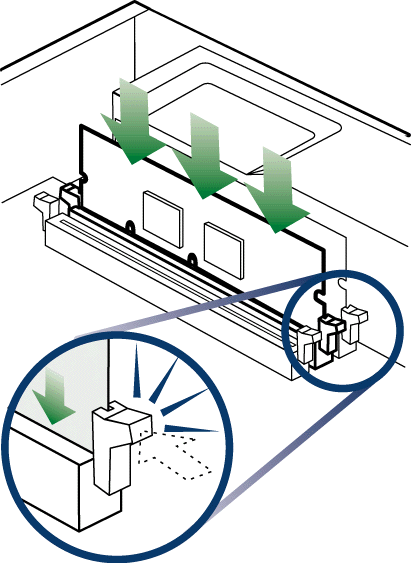
Inserting a Flash DIMM
To make sure that the configuration parameters are correct for booting from the flash DIMM, follow these steps:
[Setup] icon. The configuration screen
appears.
[Network], the [File Server].
[Ethernet (n)].
User Input for the Parameters From field.
[Apply].
You can use the remsh command to list the contents of the flash
DIMM. Enter the following command:
remsh terminalname ls /dev/ffs1
If you have two or three DIMMs, enter /dev/ffs2 and /dev/ffs3
respectively as the directory you want to list.
If all the software was not loaded, you can try rebooting your Netstation, or you can use the Flash File Manager to reprogram the flash DIMM. Refer to Using Flash File Manager for more information on using the Flash File Manager.
If you are connected to a LAN (through serial, SLIP, or PPP), you can boot from the host. Refer to Adding HP Netstations to Your Network and Configuring Your Netstations for more information.
Once you have successfully booted from the host, you can use the Flash File Manager to reprogram the flash DIMM. Refer to Using Flash File Manager for more information on using the Flash File Manager.
You can also install:
If you do not install a 100VG card or a ThinLAN/AUI card, you can install a second 100BaseT card.
For network troubleshooting information, refer to: Solving Problems Related to the Networking Card.