![[Previous]](prev.gif)
![[Next]](next.gif)
![[Contents]](toc.gif)
![[Index]](index.gif)
This chapter tells you how to configure your Netstations.
The first section, Configuration Methods, explains the different configuration methods and how they work together. The configuration methods are described in more detail in the following sections:
Configuration Parameters That You May Want to Customize explains some of the most commonly used configuration parameters. For detailed information about configuration parameters, see Remote Configuration Parameter Reference.
When you add a Netstation to your network with xtadm scripts, you may never
need to change the configuration of your Netstation. If you would like to
make changes, however, you can use a combination of three methods
to customize your Netstation configuration:
By default, all three types of configuration are enabled:
For information about changing these defaults, see Changing the Configuration Methods.
You can access the configuration screens while you are booting the Netstation or, more commonly, within an X session. If you cannot access some or all of the configuration screens, the administrator may have blocked access as described in Securing the Configuration Screens.
To access a limited number of configuration screens during the
initial phase of bootup, select the Setup icon. Configuration screens will
appear only for the hardware that is present and the extensions that
are loaded by the directives file.
You can use the configuration screens before the X server has been
downloaded, but the X server configuration screens will not appear.
You can access the online help by selecting [Help].
The configuration is an X-based local client. When you access the configuration screens, you can re-size and iconify the window, and leave it running during the session.
To access the configuration screens from within an X session,
press and hold [F12].
(On the LK201-layout keyboard, [F12] refers to the key
labeled [F3].)
You can also access the configuration screens with the following command:
remsh terminalname config
On Sun systems, the command is rsh instead of remsh.
The configuration screen appears in a window as follows:
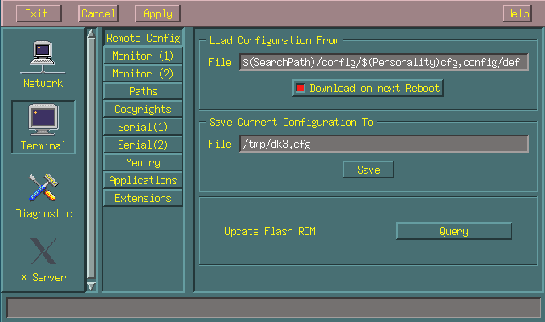
A Configuration Screen
You use the configuration screens as follows:
[Diagnostic], then [Log].
[Apply]. All your changes are saved and
while some take effect immediately, the rest take effect the next time
the Netstation is booted.
If you need information about a field in the configuration screens, select Help.
Many configuration values take effect immediately.
Others do not take effect until you select [Apply] and reboot your Netstation.
To cancel all of these deferred changes, select [Cancel].
To cancel all of the changes that you have ever made,
and return to the defaults that are shipped with HP Netstation Software,
select
[Restore to factory defaults...] on the Diagnostic - Restore Defaults
configuration screen.
Your Netstation automatically reboots and the default configuration settings
are restored.
If you are familiar with using xset, you can use this host utility to change your X server configurable values for the current session only. For more information, see:
man xset
The following files
in /opt/hpxt/enware2/xthome/config
are used in remote configuration:
sample.cfg is copied to
terminalname.cfg when you add a Netstation
with the administration scripts.
(For more information about the administration scripts, see Invoking the Netstation Administration Scripts.)
default.cfg is read if no
terminalname.cfg file is found.
In general, there are five ways to customize a Netstation through remote configuration:
sample.cfg).
Any new Netstations that are added with the administration scripts
will use the new values;
existing Netstations will be unchanged.
These possibilities are described in more detail below. For information about parameters that are commonly customized, see Configuration Parameters That You May Want to Customize.
When you add a Netstation using the administration scripts,
the sample remote configuration file is copied from
/opt/hpxt/enware2/xthome/config/sample.cfg
to terminalname.cfg.
You can edit a terminalname.cfg file to make changes that affect
only one Netstation.
.cfg (this file will be in place if you use
the administration scripts or create it manually from sample.cfg.)
If the terminalname.cfgfile does not exist, the Netstation uses
the file called default.cfg.
If you want some parameters to have the same values for all Netstations, you should do one of the following before adding any Netstations:
/opt/hpxt/enware2/xthome
/config/sample.cfg).
The remote configuration file can contain include statements. The include statements can contain variables. By using include statements and variables, you can combine site-wide defaults and individual preferences.
For example, the following include statements:
include $(BasePath)/config/$(Personality)aliases
include $(BasePath)/config/site.aliases
would include a personal aliases file followed by an aliases file for the entire site.
Each include file is read whenever the remote configuration file is read. Changing a parameter in an include file is much easier than changing the same parameter in every remote configuration file.
You can specify aliases for commonly used strings. For example, if you create an alias for the baud rate of your serial ports, add the line:
alias baud = 4800Then, change the Serial (n) Baudrate parameter(s) as follows:
Serial (2) Baudrate = baud
Serial (1) Baudrate = baud
Aliases are also used to support translation into other languages.
When specifying the value of a remote configuration parameter, you can include variable names. When the remote configuration file is read, the variable name is replaced by the value of the corresponding remote configuration parameter.
You can use the following variables:
$(BasePath) is the base path.
See BasePath.
$(FileServerList) is the list of potential file servers
and their access mechanisms.
See File Server List.
$(SearchPath) specifies which paths are searched for files,
in which order.
See SearchPath.
$(LANG) is the language of the Netstation.
See LANG.
$(TerminalName) is the name of the Netstation.
See Terminal Name.
$(NodeNameList) is a list of the terminal names and
IP addresses for each of the Netstation's network interfaces.
See Node Name List.
$(Personality) is a user-defined personality for the Netstation.
See Personality.
For example, if:
xterm16
125.4.5.6
fileserver1 and its access mechanism is nfs
fileserver2 and its access mechanism
is tftp
and you specify:
BasePath = /opt/hpxt/enware2/xthome
Remote Config File = $(SearchPath)/config/$(Personality).cfg
the Netstation loads the first available file from the following list:
/opt/hpxt/enware2/xthome/config/xterm16.cfg
/opt/hpxt/enware2/xthome/config/125.4.5.6.cfg
/opt/hpxt/enware2/xthome/config/.cfg
/nfs/fileserver1/opt/hpxt/enware2/xthome/config/xterm16.cfg
/nfs/fileserver1/opt/hpxt/enware2/xthome/config/125.4.5.6.cfg
/nfs/fileserver1/opt/hpxt/enware2/xthome/config/.cfg
/tftp/fileserver2/opt/hpxt/enware2/xthome/config/xterm16.cfg
/tftp/fileserver2/opt/hpxt/enware2/xthome/config/125.4.5.6.cfg
/tftp/fileserver2/opt/hpxt/enware2/xthome/config/.cfg
By default, DHCP (dynamic host configuration protocol) and the related BOOTP (boot protocol) are standard protocols that download network configuration information to a Netstation when it boots. (If BOOTP/DHCP is not available on the host, BOOTP is used instead.)
The network configuration information includes the IP addresses of the Netstation and the computers it accesses. It overrides any information that is specified on the configuration screens.
There are two main advantages of using network configuration:
/etc/bootptab on HP-UX and IBM systems or
/opt/hpxt/enware2/bootp/bootptab on Sun systems)
and is easy to maintain.
bootptab file has been set up, the user of a new Netstation
does not need to configure it before using it.
When the Netstation starts up, it sends a boot request
that contains its Ethernet address.
The host software looks through bootptab for this address.
If a match is found,
the network configuration data for the Netstation is extracted
from bootptab and sent as a packet over the network.
If no match is found and BOOTP/DHCP (rather than BOOTP) is running on the
host, dhcpd searches for a resource file that contains
IP addresses and terminal names you have made available.
If dhcpd can find an available IP address and terminal name, it assigns
them to the Netstation.
If the Netstation is not in bootptab and dhcpd cannot find
an available address and terminal name,
the Netstation fails to boot.
The remote configuration file contains well over 100 parameters that you can customize. Most of these parameters can also be customized through the configuration screens.
The following sections describe some of the most commonly used parameters:
For a complete list of remote configuration parameters, view the
/opt/hpxt/enware2/xthome/config
/sample.cfg file or see Remote Configuration Parameter Reference.
For a list of currently configurable parameters for your Netstation, issue the command:
remsh terminalname get config
On Sun systems, the command is rsh instead of remsh.
get config command returns only the currently configured
parameters for the specified Netstation. For example, if the serial port driver
is not installed on the Netstation, the remsh terminalname get config
command will not show any serial port parameters. For more information
on loading drivers and extensions, see Customizing Your Netstations.
By default, an XDMCP (X Display Manager Control Protocol) request is sent to the file server when your Netstation is booted. You can change this as follows:
You can specify the following values:
For example, to specify which host receives the XDMCP request, use either of the following:
For XDMCP Direct or XDMCP Indirect, you can specify a list of hosts. The default is all file servers included in the list.
For XDMCP Broadcast or XDMCP Broadcast Auto, you can specify a list of hosts. The default is all of the servers on the local subnet.
You can also limit the Netstations that a particular workstation will manage, as described in Controlling Which Netstations a Workstation Will Manage.
To change the default font path, use either of the following:
If you are using the default fonts on the workstation (before the software was installed) instead of the Netstation's, you should remove the Netstation's fonts from the font path to save memory. For more information, see Using the Workstation's Fonts.
Various configuration parameters affect security.
For more information about these security options, see Security Options.
By default, local configuration, remote configuration, and network configuration are all enabled. You can change the default as follows:
[Download on Next Reboot]
on the Terminal - Remote Config configuration screen.
[Parameters From] on the Network - Ethernet (1) (or the Network - 100VG)
configuration screen.
The default keyboard is USASCII PC 101/102. If you have a different keyboard, use either of the following:
For information about other ways you can customize your keyboard, see:
For a list of supported keyboards, see the Terminal configuration screen
or the sample remote configuration file (/opt/hpxt/enware2/xthome/config/sample.cfg).
In addition to keyboards, the following input devices are supported:
You can set up an input device, use either of the following:
With the Input Drivers remote configuration parameter, you set Input Drivers equal to the name of an input driver, optionally followed by a default path and parameters. For example:
PS2_KEYBOARD /dev/ps2kbd (PS/2 keyboard driver)
PS2_MOUSE /dev/ps2mouse (PS/2 mouse driver)
PC_MOUSE /dev/serial1 (RS232 PC mouse)
NULL_KBD /dev/null2 (Keyboard cannot be used)
NULL_MSE /dev/null2 (Mouse cannot be used)
HP_TABLET /dev/serial1 (HP graphics tablet)
HP_BUTTONBOX /dev/serial1 (HP button box)
HP_KNOBBOX /dev/serial1 (HP dial box).
In the preceding list, serial1 refers to the first serial port.
If the device is connected to the second serial port, use serial2 instead.
For example, to use both a serial mouse and a tablet you could specify:
Input Drivers = PC_MOUSE /dev/serial1, HP_TABLET /dev/serial2
The Netstation does not need a keyboard or a mouse to boot successfully. You can plug in a PS/2-type keyboard or mouse after booting. Please note that if you connect two of the same PS/2 devices (for example, two keyboards), only one will work.
You do not need to do any configuration changes to use a space ball. Applications that use a space ball provide their own drivers.
To use a tablet, you may need to set additional remote configuration parameters:
HP_TABLET
TABLET
and set the Other Pointers remote configuration parameter
(Other Pointers)
to
TABLET
The gateway list determines which gateway is used to access a particular network or host. To change the gateway list, use either of the following:
The Gateway value is the IP address or name of a gateway. The Route To value is an IP address. The Subnet Mask further qualifies the Route To value. Do not enter a value for the Subnet Mask unless you are dividing the network into subnets. If the IP address of the destination matches both the Route To value and the Subnet Mask value, the specified gateway is used.
At the end of the gateway list, you can specify a default gateway
with a Route To value of 0.0.0.0.
To use proxy ARP (Address Resolution Protocol),
specify the Netstation's IP address for the Gateway
and 0.0.0.0 for the Route To value.
For information about other subnet masks, see:
Several configuration parameters affect either the amount of Netstation memory that you use or the amount of information that you receive about memory usage. For information about a specific parameter, see:
For more information about optimizing your use of memory, see Using Netstation Memory Effectively.
Each message has one of the following syslog message classes:
<EMERGENCY><ALERT><CRITICAL><ERROR><WARNING><NOTICE><INFO><DEBUG><CLIENTERR><CLIENT>Based on the message class, you can specify which messages are displayed in the Log screen and which messages are routed to other hosts.
If you want to test that syslog is working correctly, generate a test message for each message class. For example:
remsh terminalname putlog "<ALERT> ALERT test"
(On Sun systems, use rsh instead of remsh.)